近些年来,我的个人项目基本上也是托管在 Github 上的。主要的原因一方面是 Github 身边的 Git Repository 使用起来体感还不错,另一方面,也是很重要的便是 Github 的 Actions。
作为一套开箱即用的 CICD 系统,Github Actions 给所有的 Public repo 提供了免费的运行时长,而对于 Private Repo,则没有那么多;我虽然购买了 Github Pro,每个月有 3000 分钟的额度可以使用,但随着你的项目越来越多,在进行的 CICD 检查越来越多,导致 3000 分钟的额度捉襟见肘,经常月中就没有了。
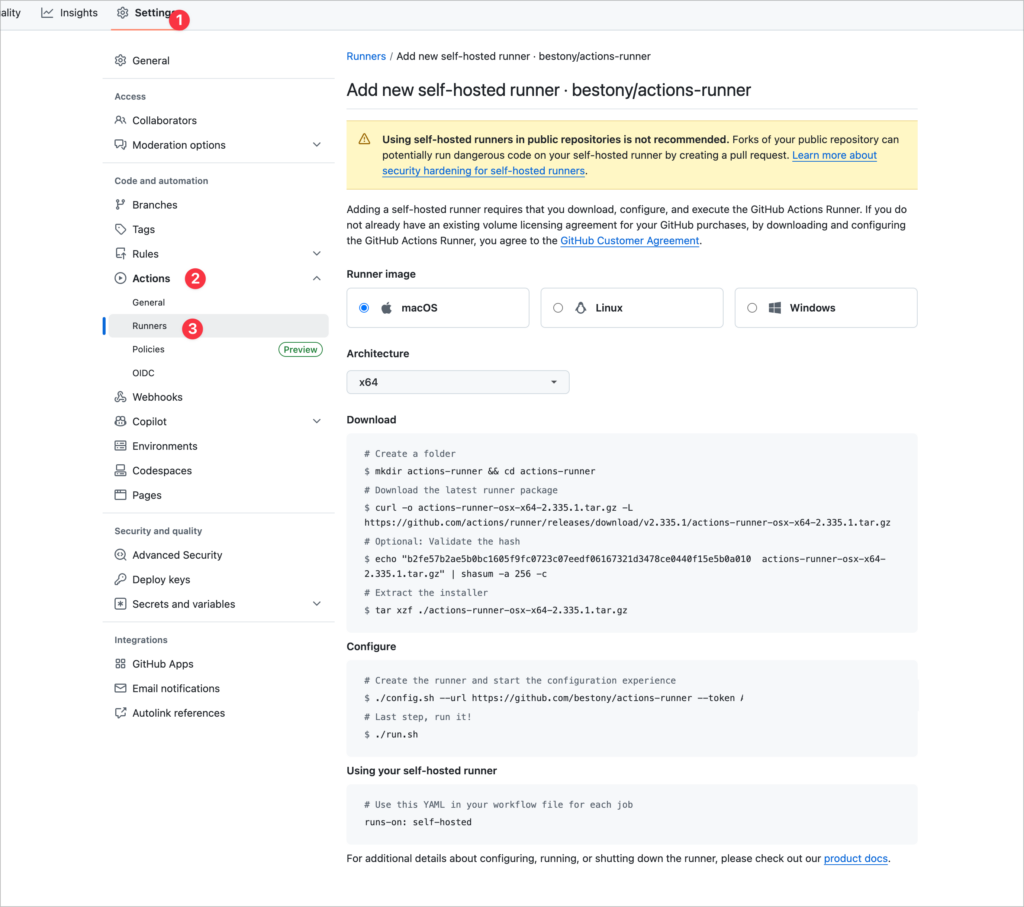
所以,我就瞄上了 Github Actions 的 self-hosted runners。其实如果你有足够的主机,配置起来挺简单的。打开 Github 仓库页面,找到 设置 - Actions - Runner 页面,就可以新增 self-hosted Runner,在新的引导页面,选择你要使用的操作系统,然后跟随下面的指引安装即可,简单易行。
不过,这个方案也有个问题,一台主机只能安装一个 Runner,而一个 Runner 只能工作于一个仓库,对于项目比较多的人来说,还是不方便,所以就有了我研究使用 Docker 化部署的方案,在研究了前人的工作之后,我对这个方案进行了一定的优化,最终形成了你所看到的这个版本。
TL;DR
如果你不想看下面的细节描述,那比较简单粗暴,直接执行下面这个命令,就可以在你的 Docker 服务上启动一个容器作为 Github Actions 的 Self-hosted Runner。
docker run -d \
  --name actions-runner \
  --restart unless-stopped \
  -e RUNNER_URL=https://github.com/<owner>/<repo> \
  -e RUNNER_REGISTRATION_TOKEN=<token-from-config-sh-command> \
  -v /var/run/docker.sock:/var/run/docker.sock \
  bestony/actions-runner:latest
Code language: Bash (bash)
其中,第四行的 Runner URL 是指你自己的 Github 的仓库地址,直接配置上就行;
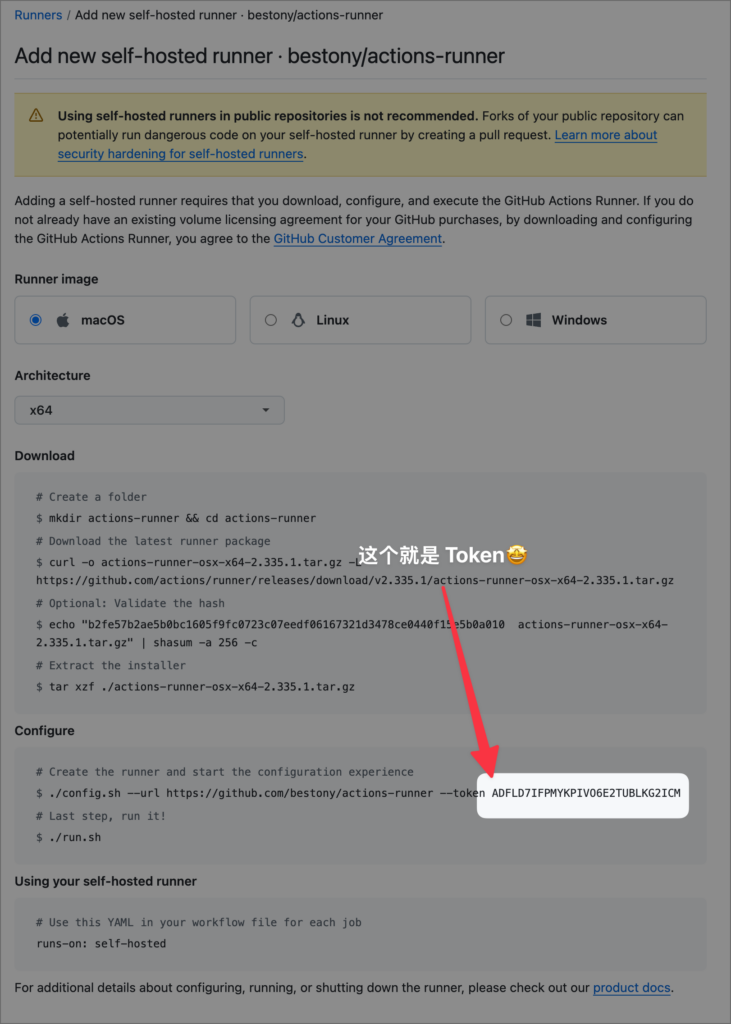
而第五行的 Token 则是你在 Runner 指引页面看到的 Config 的 Token
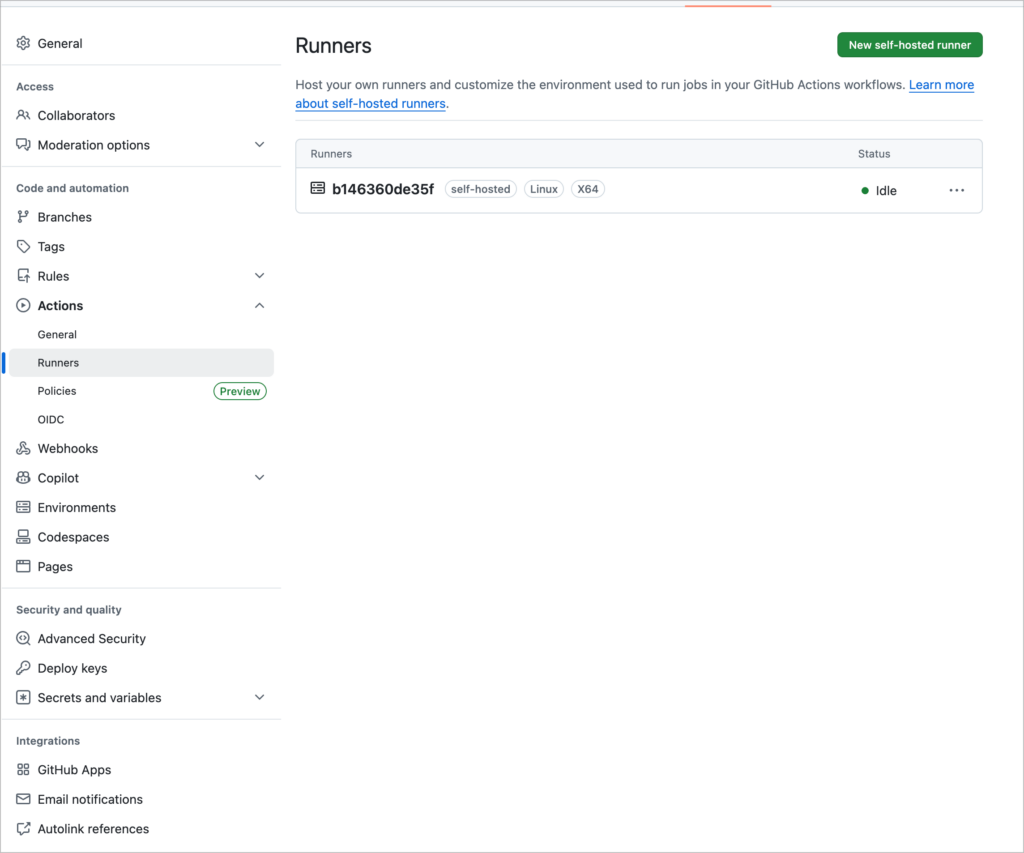
当你执行完成后,2-3 分钟,就可以在 Github Actions 设置页面的 Runner 看到刚刚启动的 Runner 了。
接下来,就是在你所有要使用 self-hosted runner 的 job 上,修改他对应的 run-on 配置即可
# Use this YAML in your workflow file for each job
runs-on: self-hosted
Code language: YAML (yaml)
支持哪些平台
我在代码层面支持了 Linux 和 Windows ,并预打包了对应的 Docker 镜像。Linux 使用的是 Ubuntu 24.04;Windows 使用的是 Windows 2022;此外,支持了 Linux的 x64,arm x64 和 arm v7, 如果你是本地 NAS 使用,应该也可以跑。不过我自己还没测试 ARM 的环境,如果你遇到问题,也可以直接提 issue 来反馈。
打包好的 Docker 镜像放在 https://hub.docker.com/r/bestony/actions-runner ,你可以在 DockerHub 页面上看到。
原理是什么?
这个实现的原理本质上就是借助 VM 的 Container 机制,将 Github Actions 的 Runner 二进制文件放在 Docker 镜像中,并通过托管 Docker Socket,来实现让容器内的 Runner 文件可以管理 Docker 容器,从而在后续执行 Job 的时候,创建对应的容器。
代码在 https://github.com/bestony/actions-runner (欢迎来 Star)
配置缓存
Github Actions 提供了缓存能力,从而可以让不同的 job 和 不同的 run 可以使用相同的缓存,减少一部分缓存的时间和成本。 Self Runner 如果想要使用缓存,并让后续的 Runner 都可以使用缓存,你可以这样配置。关于缓存服务的自部署的更多信息,你可以参考 GHA Cache Server 的文档
创建一个网络
首先,你需要创建一个 Runner 专属的网络,从而让所有的 Runner 共享一个 Cache Server,方便后续使用。比如我们这里创建一个名为 Runner 的网络
docker network create runner
启动一个 Runner
当你已经有了提前创建好的 Repo 后,就可以根据需要来创建 Runner 了。你可以直接复制我下面的这段配置,存储成为 DockerCompose.yml ,修改环境变量配置,并使用 docker compose up -d 命令来启动,从而创建一个 Runner ,并启动相应的缓存服务器,来实现启动一个带缓存的 Runner。
services:
  runner:
    image: bestony/actions-runner:latest
    restart: unless-stopped
    env_file:
      - path: .env
        required: false
    networks:
      - runner
    environment:
      RUNNER_URL: ${RUNNER_URL:-}
      RUNNER_REGISTRATION_TOKEN: ${RUNNER_REGISTRATION_TOKEN:-}
      REPO: ${REPO:-}
      TOKEN: ${TOKEN:-}
      ACTIONS_RESULTS_URL: ${ACTIONS_RESULTS_URL:-http://cache:3000/}
      RUNNER_NAME: ${RUNNER_NAME:-}
      RUNNER_LABELS: ${RUNNER_LABELS:-}
      RUNNER_WORKDIR: ${RUNNER_WORKDIR:-_work}
      RUNNER_EPHEMERAL: ${RUNNER_EPHEMERAL:-false}
    volumes:
      - /var/run/docker.sock:/var/run/docker.sock
    deploy:
      mode: replicated
      replicas: ${RUNNER_REPLICAS:-4}
      resources:
        reservations:
          cpus: "${RUNNER_RESERVED_CPUS:-0.5}"
          memory: ${RUNNER_RESERVED_MEMORY:-1024M}
        limits:
          cpus: "${RUNNER_LIMIT_CPUS:-2.0}"
          memory: ${RUNNER_LIMIT_MEMORY:-4096M}

  cache:
    container_name: cache
    image: ghcr.io/falcondev-oss/github-actions-cache-server:latest
    restart: unless-stopped
    networks:
      - runner
    ports:
      - "3000:3000"
    environment:
      API_BASE_URL: http://cache:3000
    volumes:
      - cache:/app/.data

volumes:
  cache:

networks:
  runner:
    external: true
Code language: YAML (yaml)
上面这段配置主要有几个核心配置需要关注:
- deploy 段:这部分主要是你会跑多少个 Runner,如果你的项目需要更多的 Runner 来执行 Job ,这里就可以调整的大一些;包括每个 runner 预约多少资源,能实际使用多少资源,都可以配置。
- networks 段:这部分核心是要使用之前创建好的 Runner 的网络,从而让后续的所有的 Runner 都统一使用一个网络。
启动一个新的 Runner
当你完成上述的配置,但发现你需要一个新的 Self-hosted Runner 的时候,就可以复制下面不包含 Cache Server 相关的配置,直接使用了。非常的方便
services:
  runner:
    image: bestony/actions-runner:latest
    restart: unless-stopped
    env_file:
      - path: .env
        required: false
    networks:
      - runner
    environment:
      RUNNER_URL: ${RUNNER_URL:-}
      RUNNER_REGISTRATION_TOKEN: ${RUNNER_REGISTRATION_TOKEN:-}
      REPO: ${REPO:-}
      TOKEN: ${TOKEN:-}
      ACTIONS_RESULTS_URL: ${ACTIONS_RESULTS_URL:-http://cache:3000/}
      RUNNER_NAME: ${RUNNER_NAME:-}
      RUNNER_LABELS: ${RUNNER_LABELS:-}
      RUNNER_WORKDIR: ${RUNNER_WORKDIR:-_work}
      RUNNER_EPHEMERAL: ${RUNNER_EPHEMERAL:-false}
    volumes:
      - /var/run/docker.sock:/var/run/docker.sock
    deploy:
      mode: replicated
      replicas: ${RUNNER_REPLICAS:-4}
      resources:
        reservations:
          cpus: "${RUNNER_RESERVED_CPUS:-0.5}"
          memory: ${RUNNER_RESERVED_MEMORY:-1024M}
        limits:
          cpus: "${RUNNER_LIMIT_CPUS:-2.0}"
          memory: ${RUNNER_LIMIT_MEMORY:-4096M}

networks:
  runner:
    external: true
Code language: YAML (yaml)
总结
如果你和我一样,喜欢用 Github,但又没有足够多的 Github Actions 运行时长可用,或者你需要依赖一些你自己的内网环境,那么这个 self-hosted runner,就是为你准备的。